
VectorCode is a powerful tool that enables Claude to understand your local codebase, providing more contextual and accurate assistance with your projects. This guide will walk you through the installation and setup process on macOS.
This is not sponsored, I found this tool to be genuinely helpful for my workflow
What is VectorCode?
Before diving into installation, let’s understand what VectorCode brings to the table:
- Local Code Understanding: Allows Claude to understand your project’s structure and code without uploading everything
- Semantic Search: Uses vector embeddings to find the most relevant files and code snippets
It is also important to note that the larger your codebase gets, the more important VectorCode becomes as putting up entire project via libraries such as RepoMix will consume a lot of tokens. Which can lead to increase costs.
Prerequisites
Before installing VectorCode, ensure you have:
- Claude desktop application installed
- Python 3.9+ installed on your system
- Basic familiarity with command line operations
Installation Steps
These instructions were tested on macOS. Windows is not tested, hence the outcome is not guaranteed
These instructions were tested on macOS. Windows is not tested, hence the outcome is not guaranteed
1. Install pipx
pipx is a tool to install and run Python applications in isolated environments, which is perfect for tools like VectorCode.
If you don’t already have pipx installed:
brew install pipx
pipx ensurepath
2. Install VectorCode and Dependencies
With pipx available, we can now install ChromaDB and VectorCode:
As of writing, there are users experiencing version issues and compatability with Vectorcode 0.5.5 with ChromaDb 1.0.0 It is suggested to install ChromaDb 0.6.3 instead bash
pipx install chromadb==0.6.3 --force
Please track this issue for updates https://github.com/Davidyz/VectorCode/pull/36
As of writing, there are users experiencing version issues and compatability with Vectorcode 0.5.5 with ChromaDb 1.0.0 It is suggested to install ChromaDb 0.6.3 instead bash
pipx install chromadb==0.6.3 --force
Please track this issue for updates https://github.com/Davidyz/VectorCode/pull/36
pipx install chromadb
pipx install vectorcode
pipx install vectorcode[mcp]
The last command installs the MCP (Model Control Protocol) component, which enables the communication between Claude and VectorCode.
You can choose to install the ChromaDb via Docker.
3. Start the ChromaDB Server
VectorCode uses ChromaDB to store vector embeddings of your code. You need to run the database server:
chroma run --path ~/.local/share/vectorcode/chromadb/ --port 6131ChromaDb must be running at all times in order for the files to be uploaded to the database, as well as queried by the LLM
- The path should be the default storage location for VectorCode
- The port (6131) is the default expected by VectorCode
These are modified at .vectorcode/config.json of a project, there is also a global setting but not recommended to adjust
- The path should be the default storage location for VectorCode
- The port (6131) is the default expected by VectorCode
These are modified at .vectorcode/config.json of a project, there is also a global setting but not recommended to adjust
If you’re unsure about the correct path, you can find it by checking where VectorCode is installed:
which vectorcode  # macOS/Linux
where vectorcode  # Windows
4. Configure Claude Desktop to Use VectorCode
Now we need to tell Claude about our VectorCode installation:
-
Find your Claude desktop configuration file:
- It’s typically located at
~/.config/claude-desktop/claude_desktop_config.jsonon macOS/Linux - On Windows, check in your AppData folder
- It’s typically located at
-
Edit the configuration to add VectorCode as an MCP server:
{
  "mcpServers": {
    "vectorcode": {
      "command": "/Users/username/.local/bin/vectorcode-mcp-server",
      "args": []
    }
  }
}
Replace /Users/username/.local/bin/vectorcode-mcp-server with the correct path for your system. You can find this path with:
which vectorcode-mcp-server  # macOS/Linux
where vectorcode-mcp-server  # Windows
5. Restart Claude Desktop
After saving your configuration changes, restart the Claude desktop application to apply them.
Using VectorCode with Your Projects
Once you have VectorCode installed, you can start using it with your projects. Here’s how to get started:
Initializing Your Project
First, navigate to your project root directory and initialize it for VectorCode:
cd /path/to/your/project
vectorcode init
This creates a .vectorcode directory in your project root, where configuration files will be stored. If you already have a global configuration at ~/.config/vectorcode/config.json, it will be copied to your project.
If you skip the initialization step, VectorCode will look for a directory
containing a .git/ subdirectory and use it as the project root. If no
.git/ directory exists, it will use the current working directory.
If you skip the initialization step, VectorCode will look for a directory
containing a .git/ subdirectory and use it as the project root. If no
.git/ directory exists, it will use the current working directory.
Database Configuration
Modify your file at .vectorcode/config.json
{
  "host": "127.0.0.1",
  "port": 6131
}
Vectorizing Your Code
To index your code for Claude to understand, use the vectorise command:
Make sure the ChromaDb is started and running
# Vectorize specific files
vectorcode vectorise path/to/your/file.js

# Recursively vectorize a directory
vectorcode vectorise src/ -r
VectorCode will respect your .gitignore file by default. If you want to force indexing of ignored files, use the -f or --force flag.
VectorCode doesn’t automatically track file changes. You’ll need to re-vectorize edited files for Claude to access the latest version. Consider setting up a git pre-commit hook to automate this process.
VectorCode doesn’t automatically track file changes. You’ll need to re-vectorize edited files for Claude to access the latest version. Consider setting up a git pre-commit hook to automate this process.
For large repositories, you might experience slower queries. If this happens, consider using vectorcode drop to remove the current index and then only vectorize the most important files.
Making Queries
Once your code is vectorized, you can query it:
# Basic query
vectorcode query "How does the authentication system work"

# Retrieve more results
vectorcode query -n 5 authentication

# Multiple keywords
vectorcode query user authentication permissions
The results will show relevant files sorted by their similarity to your query.
For complex queries, wrap your sentence in quotation marks for more accurate results.
For complex queries, wrap your sentence in quotation marks for more accurate results.
Managing Collections
VectorCode organizes your indexed code in collections. Here are some useful commands:
# List all collections
vectorcode ls

# Remove a collection
vectorcode drop

# Check your configuration
vectorcode check config
Verifying Your Installation
To verify that VectorCode is working correctly:
- Start a new conversation in Claude
- Type: “List my VectorCode collections” or “Can you use VectorCode to help me with my project?”
- Claude should recognize and be able to use VectorCode commands
Here is an example prompt and apporach that I usually use to let Claude understand and work with my project
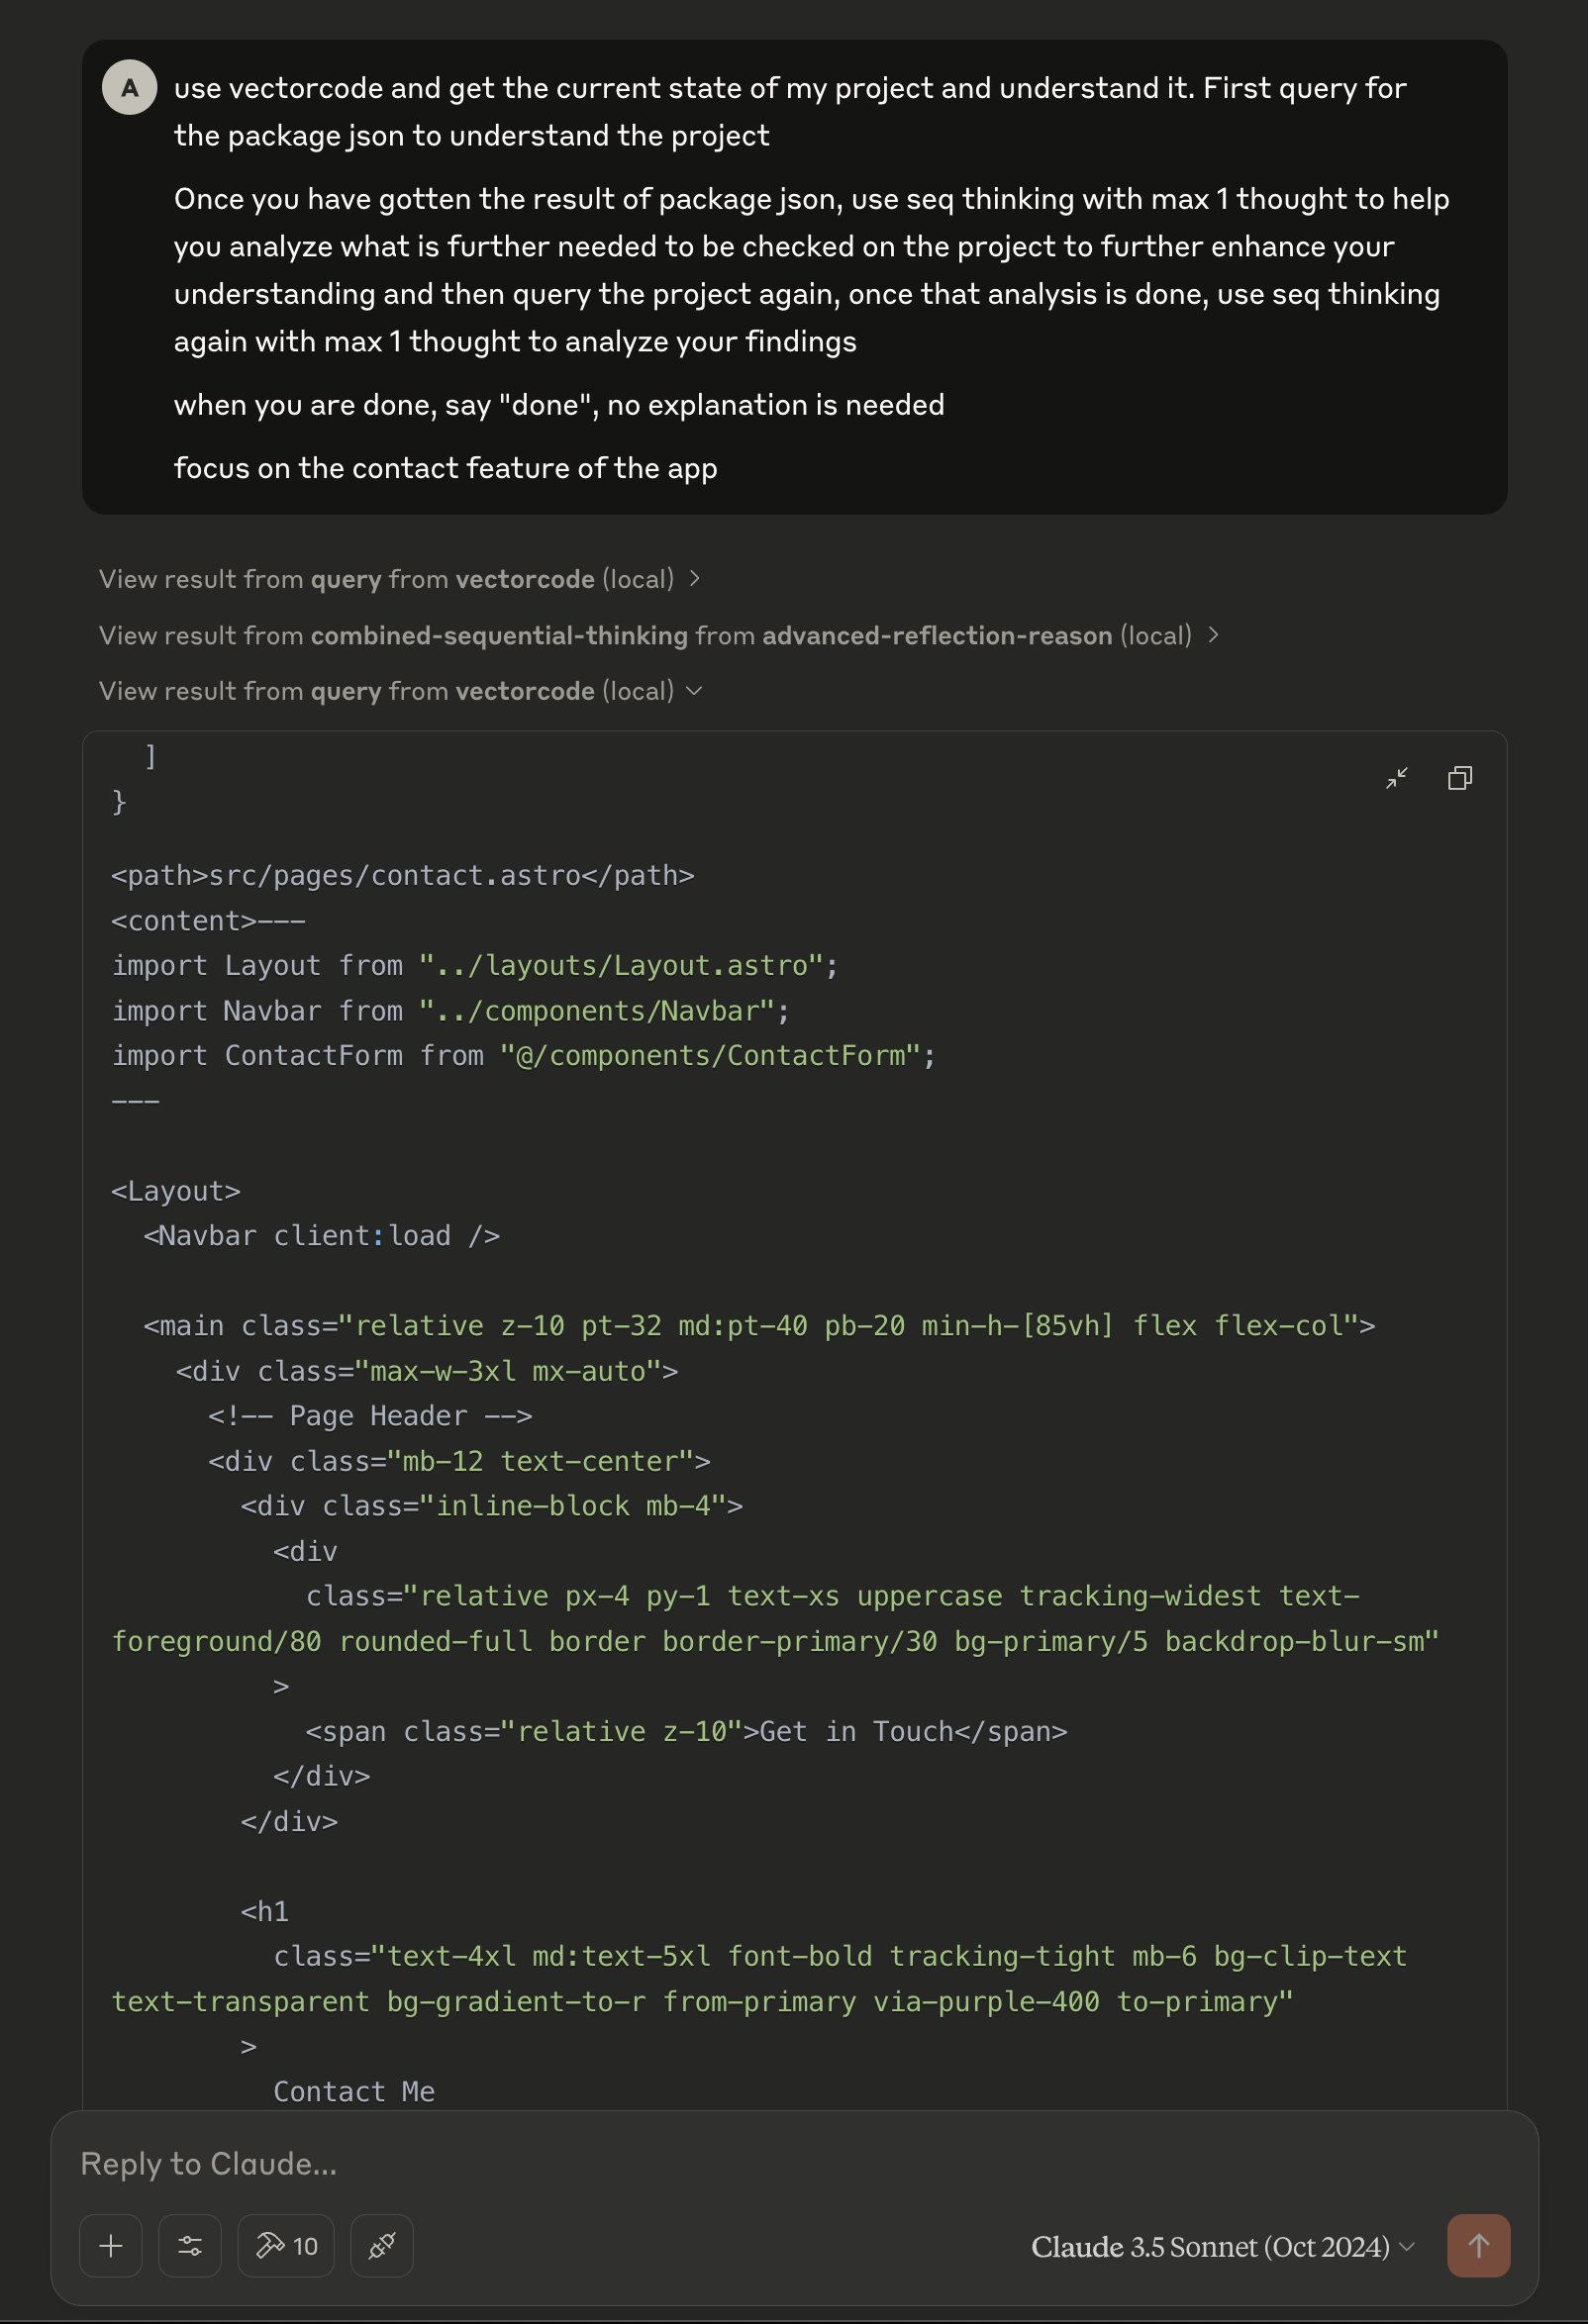
Example prompt with VectorCode
Based on the image above, you can see Claude has successfully obtained the context of my project via VectorCode
Here is my project instruction
Current project root is located at {/insert/your/path}

You must use vectorcode whenever you need to get relevant information of the project source. Esepcially the package.json when asked to understand the current project

I'm working on a blog application built with Astro Typescript project and Tailwind CSS with Shadcn UI
Troubleshooting Common Issues
Nothing Shows Up in Query Results
If your queries aren’t returning results:
- Check if your collection exists with
vectorcode ls - Try re-indexing your project with
vectorcode dropfollowed byvectorcode vectorise - Verify your ChromaDB connection (port 6131 by default)
The most common error I’ve encountered is this:
Cannot return results in a contigious 2D array. Probability ef or M is too small
This can be solved by dropping and re-vectorise it
The most common error I’ve encountered is this:
Cannot return results in a contigious 2D array. Probability ef or M is too small
This can be solved by dropping and re-vectorise it
Indexing Fails
If you encounter issues during indexing:
- Ensure you have sufficient disk space
- Check that you have read permissions for all project files
- Consider excluding large binary files with a
.vectorcodeignorefile
Neovim configuration
I put together a little Neovim script that’s changed how I work with VectorCode. It automatically keeps my index updated while I code, without getting in my way.
-- Global variables to store the timer and command execution state
vim.g.save_timer = nil
vim.g.command_running = false

-- Function to check for .vectorcode directory in current project
local function check_vectorcode_dir()
  -- Get the current working directory
  local cwd = vim.fn.getcwd()
  local vectorcode_path = cwd .. "/.vectorcode"
  local exists = vim.fn.isdirectory(vectorcode_path) == 1

  if exists then
    vim.api.nvim_echo({{'.vectorcode directory found in project', 'Normal'}}, false, {})
    -- Check if command is already running
    if vim.g.command_running then
      vim.api.nvim_echo({{'Command already running, please wait...', 'WarningMsg'}}, false, {})
      return -- Return false as the command didn't start *now*
    end
    -- Set running flag
    vim.g.command_running = true
    -- Show initial notification that command is starting
    vim.api.nvim_echo({{'Starting vectorcode vectorise command...', 'Normal'}}, false, {})
    -- Run the vectorcode command in a job to not block the editor
    vim.fn.jobstart('vectorcode vectorise -r .', {
      on_stdout = function(_, data)
        if data and #data > 1 then
          vim.schedule(function()
            vim.api.nvim_echo({{'Vectorcode progress: ' .. table.concat(data, '\n'), 'Normal'}}, false, {})
          end)
        end
      end,
      on_stderr = function(_, data)
        if data and #data > 1 then
          vim.schedule(function()
            vim.api.nvim_echo({{'Vectorcode stderr: ' .. table.concat(data, '\n'), 'ErrorMsg'}}, false, {})
          end)
        end
      end,
      on_exit = function(_, exit_code)
        vim.schedule(function()
          -- Clear the running flag
          vim.g.command_running = false -- Ensure this is reset *before* potential subsequent checks
          if exit_code == 0 then
            vim.notify(
              "Vectorcode indexing completed successfully",
              vim.log.levels.INFO,
              { title = "Vectorcode Complete", timeout = 3000 }
            )
          else
            vim.notify(
              "Vectorcode indexing failed with exit code: " .. exit_code,
              vim.log.levels.ERROR,
              { title = "Vectorcode Failed", timeout = 5000 }
            )
          end
        end)
      end
    })
    -- The notification is now handled in the job callbacks
    return true -- Return true as the command was started
  else
    vim.api.nvim_echo({{'.vectorcode directory NOT found in project', 'WarningMsg'}}, false, {})
    return false -- Return false as the directory wasn't found
  end
end

-- Function to handle the debounced execution
local function debounced_check_vectorcode()
  -- If a command is already running, don't schedule a new check.
  -- The current run implicitly covers recent saves.
  if vim.g.command_running then
    vim.api.nvim_echo({{'Debounce: Command already running, skipping new timer scheduling.', 'Comment'}}, false, {})
    return
  end

  -- Clear any existing timer
  if vim.g.save_timer ~= nil then
    vim.fn.timer_stop(vim.g.save_timer)
    vim.g.save_timer = nil
    vim.api.nvim_echo({{'Debounce: Previous timer stopped.', 'Comment'}}, false, {})
  end

  -- Create a new timer
  vim.api.nvim_echo({{'Debounce: Starting new 3000ms timer.', 'Comment'}}, false, {})
  vim.g.save_timer = vim.fn.timer_start(3000, function()
    vim.api.nvim_echo({{'Debounce: Timer fired.', 'Comment'}}, false, {})
    -- Ensure the timer ID is cleared *before* the check,
    -- so a quick save *during* check_vectorcode_dir doesn't see an old timer ID.
    -- However, clearing it *after* makes more sense for the debounce logic itself.
    -- Let's stick to clearing it after the check completes.
    check_vectorcode_dir()
    vim.g.save_timer = nil -- Clear timer ID *after* the check logic runs
  end)
end

-- Create the autocmd
vim.api.nvim_create_autocmd("BufWritePost", {
  pattern = "*",
  callback = function()
    debounced_check_vectorcode()
  end,
  desc = "Debounced check for .vectorcode directory on save, run command if found",
})

vim.api.nvim_echo({{'Vectorcode auto-index loaded.', 'Normal'}}, false, {})
The solution I built does a few clever things:
First, it watches for when I save files (:w in Neovim) but doesn’t immediately trigger indexing. Instead, it waits for 3 seconds of “quiet time” - meaning I’ve stopped actively saving files. This prevents the indexer from firing constantly during heavy editing.
Second, it only runs in projects that actually use VectorCode (by checking for the .vectorcode directory).
Third, it runs the indexing process in the background, so I can keep working while the index updates.
How to Use It (neovim only)
- Add this code to your Neovim configuration (e.g.,
init.lua). - Ensure you have VectorCode installed and available in your PATH.
- Start working in a project with a
.vectorcodedirectory. - Edit and save files as you normally would.
The script takes care of the rest, automatically maintaining your VectorCode index as you work.
Conclusion
VectorCode transforms how you interact with Claude when working on code projects. By properly indexing your codebase, Claude can provide more contextual and accurate assistance without requiring you to copy and paste large code snippets.
The true power of VectorCode lies in its ability to let Claude “see” your code structure and understand the relationships between different files and components, enabling a more natural and productive AI-assisted development workflow.
Note: VectorCode is actively developed and may have new features not covered in this guide. For the most up-to-date information, check the official documentation.